What is Docker and how to use it ?
I must admit that it took me some time to really understand what is Docker and the concepts behind it.

This post’s goal is to share my experience with people who heard of Docker and would like to know more about it, or understand it better.
Docker’s website describes it as “an open-source engine that automates the deployment of any application as a lightweight, portable, self-sufficient container that will run virtually anywhere.”.
This may be a bit abstract at first, so I’ll try to explain what Docker is (and is not) from my developer point of view :
-
Docker is built on top of LXC, and thereforce runs containers, not VMs as Virtualbox for instance
-
Docker containers are made of portable “images”, similar to LXC/VZ templates, but much more powerful (versionning, inheritance …)
-
Docker “images” can easily be created via Dockerfile’s, where are set the base image and the steps to run in order to create your image
-
Docker allows to have run multiple instances of your container without needing to copy the image (base system) files
-
Docker daemon (which manages / runs LXC containers) provides a REST API used by Docker CLI utility … but this REST API can be used by any application (read doc here)
-
Docker runs on virtually all operating systems (Linux, Mac OS, Windows …) and platforms (Google Cloud Platform, Amazon EC2) : read more about installing Docker
Oh, and I forgot to tell you Docker is developed in Go (see sources on GitHub) !
Let’s run our first containers
Once you’ve installed Docker on your computer, you can now create your first container (check that docker -d is running) :
$ sudo docker run ubuntu /bin/echo hello world
If you see “hello world”, that’s it !
So, you may be wondering, what is this docker run command actually doing ?
First, it downloads the necessary Ubuntu image (keep this keyword in mind) to run your container.
Then, it creates a container running the Ubuntu image, “starts it” and runs the supplied command (/bin/echo hello world) and prints the output, before “stopping” it.
Note that Docker actually did a lot more, but let’s keep it simple for now (see “Run 'hello world'” section here).
docker run command accepts many command-line options, let’s have a quick look at some very useful ones :
-
-d : run container in detached mode, printing the resulting container id
-
-i : keep stdin open, ie. when you want to take control of a shell within the container
-
-t : allocate a pseudo-tty (useful when running a shell)
-
-name : specify container’s name ; usage : -name myubuntu
-
-w : set current working directory inside the container (create it if not present) ; usage : -w /some/path/
-
-expose : expose a specified port in container’s network interface ; usage : -expose <port-number>
-
-p : forward a port from from host to container ; usage : -p 127.0.0.1:8080:80 (will bind local port 8080 to container’s port 80)
Running your container with shell command as argument, in detached mode, will give a similar behavior as a regular LXC :
$ sudo docker run -d -i -t ubuntu /bin/bash
This command should output the newly created container id. You may also get it (in it’s short version) running sudo docker ps (only active containers are shown, use -a option to show all) :
CONTAINER ID        IMAGE               COMMAND             CREATED             STATUS              PORTS               NAMES
ecd101259f8f        ubuntu:12.04        /bin/bash           2 seconds ago       Up 2 seconds                            focused_franklin
“Focused franklin” container is up and running Ubuntu 12.04 since 2 seconds ! Try to attach it :
$ sudo docker attach <your-container-id>
Install “ping” utility (yes, image really is a bare Ubuntu) running apt-get update && apt-get install ping net-tools, and try to ping www.google.com. Wow, network is already fully working, you can see details with a simple ifconfig.
Exit (and stop) the container by pressing CTRL+D or typing exit.
You might also want to get some more informations about any of your container or image by running :
$ sudo docker inspect <container-id>
Cleaning up
If you wish to clean / remove all the Docker containers you’ve created, run this line (this will remove all your existing containers) :
$ sudo docker ps -a | grep ^[0-9a-f] | cut -d " " -f 1 | xargs sudo docker rm
Images, containers …
So far, you may still be wondering what’s the difference between images and containers (see this Wikipedia article about OS-level virtualization if you are not familiar with containers).
In my opinion, images are what make Docker a really powerful and interesting tool.
Think of Docker images as the evolved version of LXC/OpenVZ templates : an image is a read-only layer, containing an operating system with some applications for instance, on top of which your container will be built (with its own read-write layer).
Very important thing to keep in mind : images can never be altered. Each change made to an image actually creates a new image that references the one it’s been built from.
This offers a nice inheritance system : you can create & maintain images that reference each other. For example, this Elasticsearch image in Docker index references a Java image, which references a custom Ubuntu image, on top of the Docker’s base Ubuntu image. See the power of Docker ?
You can even visualize this with little help of Graphviz’s dot utility ; I pulled both ubuntu:latest and debian:wheezy images, here is the images graph that I get :
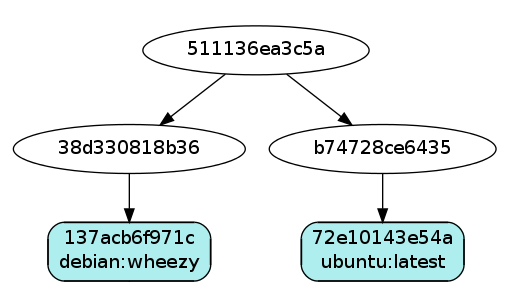
See, even Debian and Ubuntu image reference a same base image !
Layers
Let’s say you create an image based on Ubuntu, and add (install) PHP in it, a new image will be created with base Ubuntu image as parent (see explicit schemas at Docker.io).
Any container using this newly created image will therefore be made of 3 layers :
-
Container’s read-write layer
-
“PHP install” image’s read-only layer
-
Ubuntu image’s read-only layer
This union of read-only/read-write layers is called Union File System.
Within the container, no changes can be made on the images files : these actually create a copy of the modified file(s) inside the container’s read-write layer.
You can use the docker diff command to view added (A) / changed (C) / deleted (D) files in your container’s read-write layer, in comparison with it’s image. Here’s an example :
$ sudo docker diff <container-id>
C /dev
A /dev/kmsg
C /tmp
C /tmp/hsperfdata_root
C /usr
C /usr/share
C /usr/share/elasticsearch
A /usr/share/elasticsearch/data
A /usr/share/elasticsearch/data/elasticsearch
A /usr/share/elasticsearch/data/elasticsearch/nodes
A /usr/share/elasticsearch/data/elasticsearch/nodes/0
A /usr/share/elasticsearch/data/elasticsearch/nodes/0/_state
A /usr/share/elasticsearch/data/elasticsearch/nodes/0/_state/global-3
A /usr/share/elasticsearch/data/elasticsearch/nodes/0/indices
A /usr/share/elasticsearch/data/elasticsearch/nodes/0/indices/index
A /usr/share/elasticsearch/data/elasticsearch/nodes/0/indices/index/0
A /usr/share/elasticsearch/data/elasticsearch/nodes/0/indices/index/0/_state
A /usr/share/elasticsearch/data/elasticsearch/nodes/0/indices/index/0/_state/state-4
A /usr/share/elasticsearch/data/elasticsearch/nodes/0/indices/index/0/index
A /usr/share/elasticsearch/data/elasticsearch/nodes/0/indices/index/0/index/_checksums-1391120105322
A /usr/share/elasticsearch/data/elasticsearch/nodes/0/indices/index/0/index/segments.gen
A /usr/share/elasticsearch/data/elasticsearch/nodes/0/indices/index/0/index/segments_4
A /usr/share/elasticsearch/data/elasticsearch/nodes/0/indices/index/0/translog
A /usr/share/elasticsearch/data/elasticsearch/nodes/0/indices/index/0/translog/translog-1391119827027
...
Creating an image with container’s changes
You made changes in your container and would like to save the result as an image ? Nothing simpler to do with the docker commit command.
Tags
Last but not least, images have tags, allowing you to identify a specific version of an image.
For instance, base Ubuntu image has 3 tags (versions) available : latest (default), quantal (12.10) and precise (12.04).
You can specify which tag you want to use by using this syntax : image:tag (ie. docker pull ubuntu:latest).
Docker images index
When you begin using Docker, you’ll pull (more on docker pull command) images from the main Docker index, browseable through https://index.docker.io/ (and docker search command).
You can also use private repositories (on top of your own/private Docker registry) : read more about private repositories in the official documentation.
The Dockerfile
You have several ways to build your custom image. I already talked about the “docker commit” way (see above), let’s talk about the Dockerfile way.
A Dockerfile simply is a set of instructions to run over a base image. Docker will build an image from your Dockerfile, which will result in a final image.
Note that an intermediate image is built after each instruction is ran, so you can revert to any step of the build process.
Elasticsearch Dockerfile sample
Let’s take a sample Dockerfile that simply install and runs Elasticsearch on a base Debian Wheezy image, in which I commented each line :
# You must specify a base image ; in this example,
# tag wheezy of image debian will be pulled
# from Docker’s public repository
FROM        debian:wheezy
# Who maintains this Dockerfile
MAINTAINER  Michael BOUVY <michael.bouvy@gmail.com>
# Each RUN command creates a new version of your image.
# We use it here to install necessary tools / applications
# needed by Elasticsearch
RUN         apt-get update && DEBIAN_FRONTEND=noninteractive apt-get -y install adduser openjdk-7-jre-headless
# Download the Elasticsearch DEB file into /tmp
# Prefer using this method instead of downloading
# (ie. with wget) the file, so Docker can cache it
ADD        https://download.elasticsearch.org/elasticsearch/elasticsearch/elasticsearch-0.90.10.deb /tmp/elasticsearch.deb
# And install it with RUN command
RUN         dpkg -i /tmp/elasticsearch.deb
# Expose port of container
EXPOSE      9200
# Default command to run within container
CMD         ["/usr/share/elasticsearch/bin/elasticsearch", "-f"]
The resulting image is available in Docker Index and the source Dockerfile on GitHub.
As you can see, each line is a couple of an instruction (RUN, CMD, etc.) and it’s arguments.
Let’s now build a container from our newly created Dockerfile :
$ sudo docker build -t elasticsearch .
And run it (in detached mode) :
$ sudo docker run -d elasticsearch
Note the container ID, and get it’s IP address :
$ sudo docker inspect <container-id> | grep IPAddr | cut -d "\"" -f 4
Try to reach http://<container-ip-address>:9200 in your browser, you should see Elasticsearch’s output.

I'm Michael BOUVY, CTO and co-founder of Click&Mortar, a digital agency based in Paris, France, specialized in e-commerce.
Over the last years, I've worked as an Engineering Manager and CTO for brands like Zadig&Voltaire and Maisons du Monde.
With more than 10 years experience in e-commerce platforms, I'm always looking for new challenges, feel free to get in touch!